Happy Easter to all of you! Hope you all had a wonderfull time with your families and that you realised afresh what Jesus has done for us!
Love
Sandra
xxxxxx

Sunday, 31 March 2013
Project 200....roosterkoek/stokbrood
As I have explained before.....we 'braai' (BBQ)in South Africa. Any reason, any place.....with indoor 'braais' getting more and more popular, we don't even just do it in summer only anymore....it's a all year round thing now!
 This is a very old favourite from when we were kids.....we used to have long sticks, and everybody got their own piece of dough and you had to turn it around the stick and made sure you secured it well, because many a childs 'stokbrood' landed up in the ashes!
We still make it from time to time, but in a more civilised way. It is still a favourite for kids to do around a campfire though, does not matter how old they are! But for everyday purposes, the easy way......
Buy a breads' dough from your local supermarket. Allow to double in size, and then cut it in squares. First 'braai' your meat, and when the fire has cooled down slightly, place your dough pieces on top of the grill and allow to rise out nicely before turning them to do the other side.
They are great hot or cold, but I don't think anything can come to a nice hot buttered 'roosterkoek'!
You do get instant ones packed in sixes in our country, but I prefer it the traditional way. Well, sort of traditional....I suppose you can knead the dough yourself......but that's hard work!
Project 199.....upcycle an old garden tool
 I saw something similar to this some time ago, and decided that 'when I have an old tool', I was going to do it. To my surprise my husband found one! He accidentally through the dogs ball on the roof whilst playing with her, and found this on top of the roof! I never had ones like this, so it must have been there from the previous owner. What puzzled me though is that we had our roof painted not so long ago.....why didn't the painters take it off?
 I gave the whole thing a good scrub and used a kitchen scourer to take off the most rust. I then gave it a layer of modge podge, and added a piece of newspaper.....layered it with modge podge again.....then a layer of flowery chiffon material, but a serviette can work just as well.....a few more layers of modge podge, then a picture of your choice. If I did not plan to use it at the kitchen door, I would have used a bird or birdcage, but decided on an almost stick figure with muffins.....
I've cut some letters from a newspaper to spell 'welcome' and gave it some more modge podge. I jazzed it up with some lace, leaves, a small rose and some ribbon. I hung it right outside my kitchen door. We don't get rain there, so I believe it is going to be quite safe there. If not, well, then it will be another project!
Project 198....crochet a tieback
 What boredom won't do! I started making small apricot flowers on night duty without knowing what exactly I wanted to make. I had two different apricots, and made different shapes and sizes.
Seeing them lying on one heap, I decided to make a tieback for a curtain. I crochet a long chain with an olive colour yarn and started making leaves in different sizes. You can use whatever is your favourite pattern.


I then sewn them onto the chains in no specific order.....some with leaves, other without. I added see through white glass beads here and there in the centres.
 It came out so pretty, I first thought to wear it around my neck rather, but I would not have anything to wear it with......so the tieback was a better choice.....
 Project 197: caramel rolls
 Use half a batch of the dough for fairy buns as in project 196.
Make your filling as follows:
Mix together a caramel sauce by adding 1 cup of brown sugar, 3/4 cup of butter, 1/3 cup of syrup and half a tin condensed milk together and bring to boil to form a caramel sauce. If you don't like it too sweet, you can easily half the sugar. They used a different syrup in the original recipe, but it is not available here. I just used normal golden syrup.
Spray your pan with 'spray & cook' and pour your sauce in the bottom.
Now slice your dough into strips and roll each strip in brown sugar before tolling it into wheels. Place your wheels in the sauce until your pan is filled and bake it for 22 minutes @ 180*C.
Project 196: fairy buns
I got this recipe on a lovely blog after searching for a deliciously looking caramel roll recipe I noticed on Pinterest. Unfortunately I forgot the name of the blog and am too lazy to search now! For now .....the fairy buns.....
 I wondered why it was called like that, but I soon realised it could just maybe be the texture. They were very light, and the boys just polished them. We had the last few for breakfast with grated cheese this morning.
This recipe is large! I used half for caramel rolls and half for fairy buns. I got about 20 medium sized buns with half the recipe.
2 cups of boiling water
1 cup of margarine(the owner stipulated not to use butter, but margarine only)
3/4 cup of sugar
2 teaspoons of yeast(I just used one whole 10g packet, with such a lot of flour, you don't have to bother to spare the last little bit in the packet!)
3 eggs
6-7 cups of flour(I used 8, as my dough was too soft)
1 teaspoon of baking powder
1 teaspoon of salt
Melt your margarine and add with the water. Allow to cool slightly.
Add all the ingredients together and knead it until you're tired. Then ask one of the family members to knead it until they are tired, then you knead it again until you are tired. By then I am sure the dough will be done kneading! (The owner of the recipe had some similar instructions! Although she had steps of adding the ingredients. But you know by now, I keep it short! If you want to start with dry ingredients first, you're welcome!
Allow to stand in a warm place until it doubled in size. Form your buns as desired and bake for 25 minutes at 180*C. Next time I am going to paint them with sugar water before baking them.
They are great when still warm with real butter......
Saturday, 30 March 2013
Project 195...plant beans
 For us here in South Africa it is the end of summer planting, but for you guys on the other side of the world, you only start now.
I don't have a large vegetable patch anymore since we moved to town. I just want to motivate you to plant where ever you are....even on your balcony! I only had five(yes, that's correct...five!) bean stalks this past summer, but look what I have harvested!
 I have harvested this amount of beans once, and sometimes twice a week from my five stalks! It was not enough for curried bottled ones, but the access crop was frozen and will bring me far into the winter, maybe still seeing spring!
I therefore want to encourage you...even if you only have space for two stalks, it is worthwhile!
 PS. I save the green ends when processing the veggies, and work it back into the garden. At the end of the season, even the leaves will go back into the ground. Apparently this is very good for your soil. On the plot I always used my own homemade compost exclusively, but now I am forced to use shop bought compost. I still use
 the bean plants however.
 MY VEGGIE PATCH!
THIS WAS JUST PRETTY!
LOOK AT THE STEMS COLOURS!
Project 194.....grandma's toast
We used to live in the Transvaal when we were kids. During school holidays we used to go down to Port Elizabeth by train to visit my grandmother. It was a long journey, as we had to go to Johannesburg first from where we stayed and had to change trains up there. My mother always used to be very tensed at this time, and up till today, I can not understand it! It is so easy to change trains! Anyhow, maybe it has something to do with the fact that we were four kids with a six year difference from me the eldest to my youngest brother!
School holidays at my grandmother was cool! We travelled to the city by bus, and sometimes went to the beach...things that small town kids like us were not used to! And gee! If the shopping centre had a lift or escalator! That was just heaven! We would wait ages for the lift to come to go one level up or down! And my grandmother was patient.....very patient!
 Well, she used to make us these toasts at lunchtimes, and up till today, I still make it for my kids from time to time....
My grandma is in her nineties now, and went to the old age home for the first time last year. All the years she used to stay in her own house, and gee. was it neat and clean! I've never seen clean floors like hers anywhere! You could walk into her house anytime of the day....it was always spotless....with shiny floors.....done by herself!
So this morning whilst making this, I thought I'll share it, as every time I make it, I have good memories....
Pack your bread in a baking tin. Allow a vienna per slice and cut each vienna in halve and then half in lengths again so that you have four thin slices of vienna. At this stage you can butter your bread, although she never did. She believed that there is enough fat in the vienna and the cheese, and that you certainly does not need anymore! I do butter it though if I use sandwich slice cheese as it is not so fatty as normal cheddar. If I use grated cheddar I omit the butter(does make a better product this way! Unfortunately I forgot to take cheese out of the freezer, and the only defrosted ones I had this morning was slices! Anyhow the boys don't mind!)
Place your four pieces of vienna on top of your bread, then your cheese, some sliced tomato, or cherry tomatoes like I did, and season it well with Aromat(a seasoned salt). I think this is the secret ingredient as I've tried it with salt and pepper before, but just not the same results.
Place it in the oven and allow to grill until the toast hardens and the viennas start to curl up slightly.
School holidays at my grandmother was cool! We travelled to the city by bus, and sometimes went to the beach...things that small town kids like us were not used to! And gee! If the shopping centre had a lift or escalator! That was just heaven! We would wait ages for the lift to come to go one level up or down! And my grandmother was patient.....very patient!

My grandma is in her nineties now, and went to the old age home for the first time last year. All the years she used to stay in her own house, and gee. was it neat and clean! I've never seen clean floors like hers anywhere! You could walk into her house anytime of the day....it was always spotless....with shiny floors.....done by herself!
So this morning whilst making this, I thought I'll share it, as every time I make it, I have good memories....
Pack your bread in a baking tin. Allow a vienna per slice and cut each vienna in halve and then half in lengths again so that you have four thin slices of vienna. At this stage you can butter your bread, although she never did. She believed that there is enough fat in the vienna and the cheese, and that you certainly does not need anymore! I do butter it though if I use sandwich slice cheese as it is not so fatty as normal cheddar. If I use grated cheddar I omit the butter(does make a better product this way! Unfortunately I forgot to take cheese out of the freezer, and the only defrosted ones I had this morning was slices! Anyhow the boys don't mind!)
Place your four pieces of vienna on top of your bread, then your cheese, some sliced tomato, or cherry tomatoes like I did, and season it well with Aromat(a seasoned salt). I think this is the secret ingredient as I've tried it with salt and pepper before, but just not the same results.
Place it in the oven and allow to grill until the toast hardens and the viennas start to curl up slightly.
Project 193....felt keyrings
 After making the birds for the previous project, I still had enough felt for four more birds. I was a little bored of making the same birds however and two became chickens adding combs!
This time around I added a small piece of ribbon at the top and added keyring rings.....I sold three just like that and made enough profit to buy more felt! I started making different animals now, and am going to send it to my sister to sell them in a shop where she lives.
My kids were quite intrigued with this idea and came up with mind craft(hope it is spelt correctly!) figurines! I have to make a square pig and a zombie now!
project 192.....a felt mobile
 I saw these pretty colours felt at our local craft shop. Without knowing what I wanted to make, I bought four pieces. I later decided to make birds.....
I made this mobile with the first four.....
 I divided the piece of felt in four smaller squares. I then made myself a bird pattern from a piece of cardboard, and cut my birds. I then used the off-cuts to make wings, beaks and eyes. The smaller bits I stitched onto the bird pattern with blanket stitch with a contrasting colour of crochet yarn. I then used spare beads to make flowers on the wings, and glass beads on the eyes. I have sewn the two bird halves together with blanket stitch then leaving a small space for the stuffing. Finish off after stuffing it tightly.
I then crochet some strings with beads in between to hang between the birds and finished it off with bows made from organza ribbon. Easy gift to make for a friends baby room.....
Thursday, 21 March 2013
Project 191....making noise
 I saw something similar to this on the net some time ago and thought it was quite a good idea for making school projects....musical instruments.
Unfortunately my boys outgrew this, but when we started dancing at church, I remembered the idea. It was quite a mission to find suitable bells though, as not all the bells have great sound to them! When I found these, I bought all the packets they had, but still not enough. I have to wait for them to order again.
Get some ribbon and cut it in the desired lengths. I've made mine 50cm, but if you want a bigger bow, just make it longer.

Use a match or gasfirelighter to burn the ends to secure them from damaging with movement.

Sew a few bells onto the ribbon starting right in the middle and space them evenly. My bells are bigger, so I only used three per ribbon.
Now you can tie it around the wrist or ankle with a bow. We are going to use it with a dance on mothersday with finger ribbons doing an Israeli praise song....
The picture with the freckles is my sons arm! Difficult to tie a bow on your own arm!
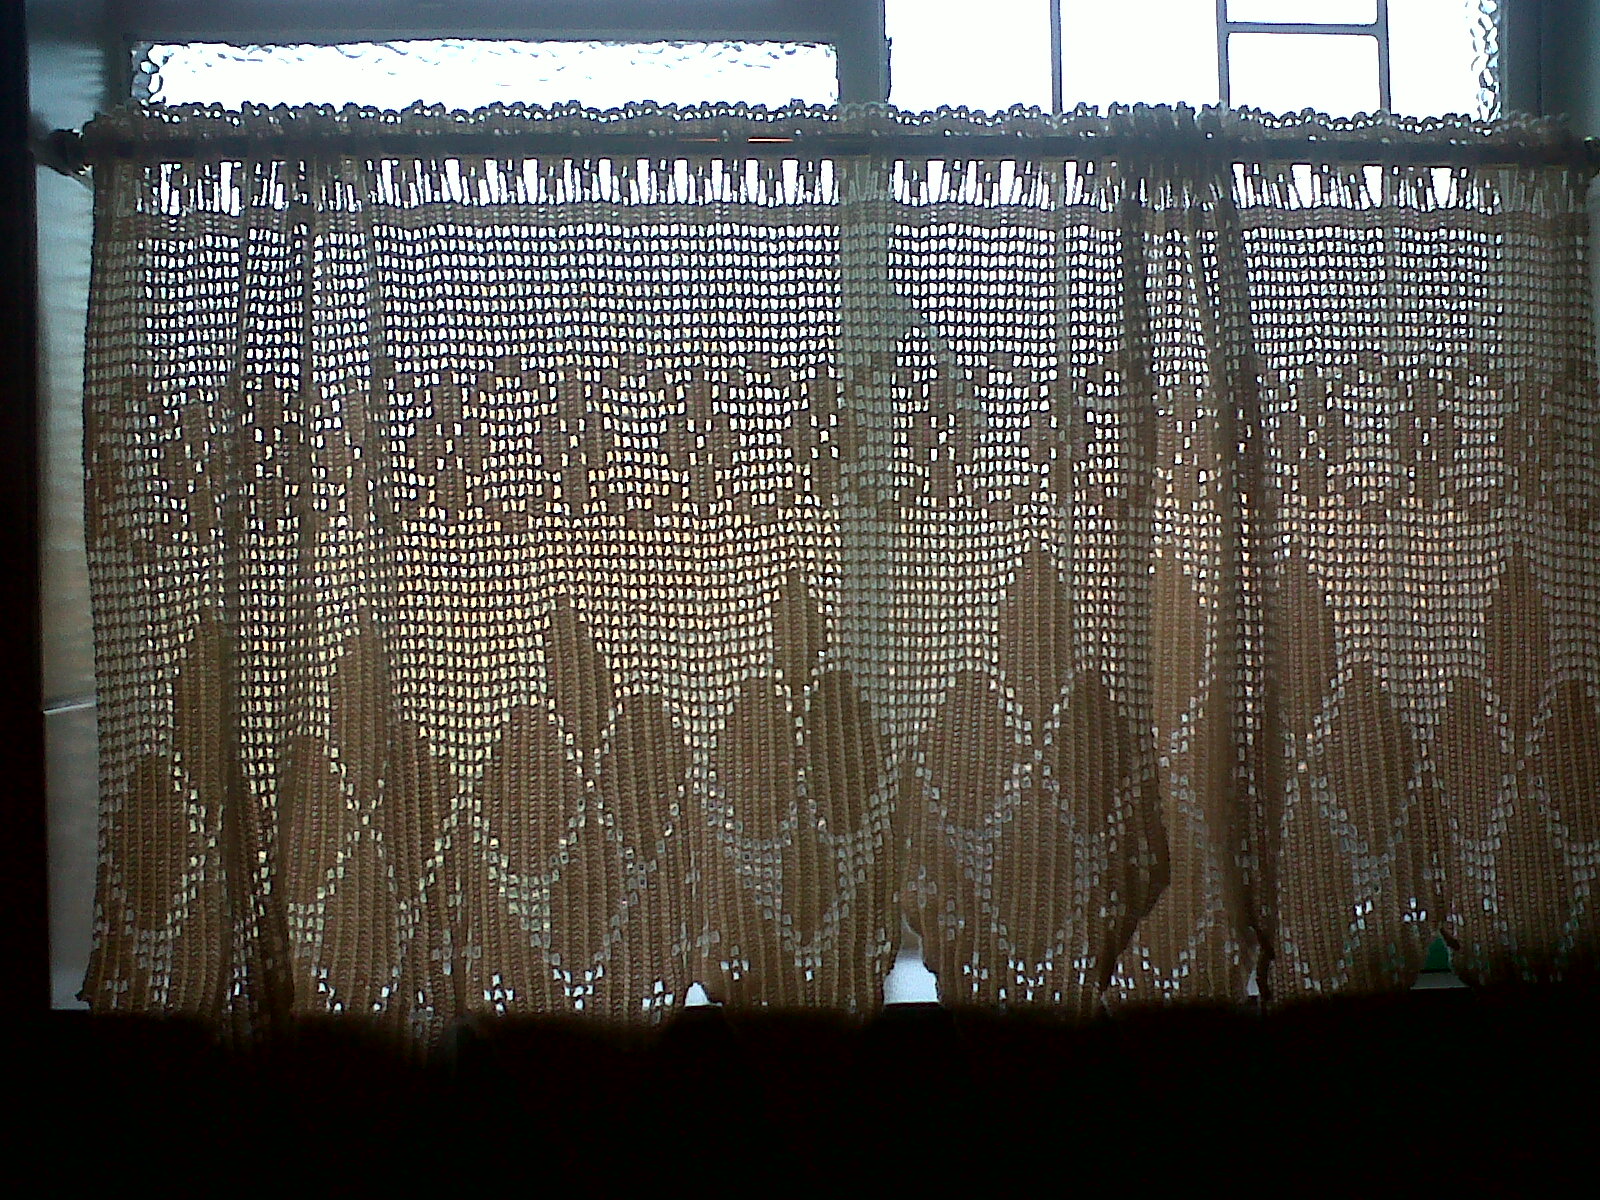
Project 190....crochet a table runner
 This one does not have the directions! Get yourself a pattern of your choice and get going!
I always loved to crochet, but for a very long time this was not very fashionable. With vintage themes everywhere it is a very relaxing hobby that you can start afresh.
 I read some time ago that old fashioned knitting and crochet are good for people with depression and likewise diseases as the repeating and rhythmic movements tend to calm you down. Now I can't remember how I felt doing it when I had a low.....but I do love the art of it.....it is so nice to start a piece and see it forming in your hands.....
I made the table runner whilst working night duty last week in the early hours of the mornings. I just had to put it all together at home.
The curtain I made for my bathroom some time ago, but I felt like sharing it.....I think just to show off! Ha Ha!
Enjoy rediscovering this old craft!
Tuesday, 19 March 2013
Project 189...a beaded neclace
 I make most of my jewelry myself. Mostly because I can not afford buying and secondly I like to wear something different. And it is so much easier if you need something in a specific colour to make it yourself. Another vain reason is the compliments! Pretty cool to say "I made it myself"!
I first put all the colours of beads I want to use on a tray....big ones....small ones and seed beads. I never have a plan, and just follow my immagination the moment I start. If you however want to draw a plan, do it.

The moment you start doing this, you will see so many possibilities! Some are slightly off balanced, others the same on both sides......Just use your immagination!
Project 188......making a chain longer
I got this neclace from my mon. She got it on her 18th birthday as a gift......she turns 71 next month!

 I wanted the chain to be longer as I am short, and I thought the blue thingie was too big resting on my biggest body parts!
I opened the chain here and there and added some head and eye pins with matching blue beads threaded through them. End the other side of the pins by closing them with pliers.
This way your chain can be any desired length and it is easy to remove again when you want it the way it was.
Project 187....jazzing up kitchenware
After decoupaging the tins, I thought I have to share this with you......
 I got a sweet orange milkjug and sugar bowl from a medical rep years ago. Although I think their product is excellent, I did not want the name on the kitchenware!....written in navy blue......
I took a piece of sandpaper and lightly sanded it over the writing. I then gave it a layer of modge podge onto which I stuck a piece of tin foil. I gave it a few more layers of modge podge, then a pretty serviette over the tin foil. I ended it off with quite a few modge podge layers. It took me a couple of days as I allowed each layer to dry properly.
I've been using this for years. I only hand wash it, and do not soak it in water. I dry it immediately after washing it, and then place it in a dry place to dry properly.
Maybe if it was not such a pretty colour, I would not have done this, but I am glad I saved it!
Project 186......knit a bag

I made these bags last year. What a pretty way to use scrap pieces of leftover wools.
Start off tying 1 metre pieces of wool together and make a ball. Try to get the colours to match.
Start with 30 stitches and knit until your piece is about 30 cm long. Then start casting off 1 stitch at the beginning of every row until you have only two stitches left. Knit them together and cast off.
Sew the sides together and use a crochet hook or needle to get all the loose pieces to the front. Then loosen the ends of the threads to make fluffs. Use a crochet hook to make a sling, and crochet some chains for a buttonhole in the front. Jazz it up with some beads here and there or some buttons.
If you don't have enough fluffs simply thread some scrap pieces of wool through the bag and tie it with knots before taking the yarn apart.
As you know by now, I love pinks and purples, but I've made some brown ones as well with great success. Just use the colours you like.
project 185....watermelon jam with chillies
I made some watermelon jam the other day, and decided the next batch was going to get some bite! The sweetness asked for some chillies......my own crazy idea! But it worked!
You need the peels of the watermelon cut into small 0.5x0.5cm squares. Soak overnight in a slaked lime solution of 5ml slaked lime added to every litre of water. The next morning drain it, and soak it for two hours in clean water.
 Weigh your fruit pieces and cook it in clean water until you can stick a match through it. Add 3 copper coins to the pot. Wash them properly before adding. This helps to make the fruit clearer, and it really works. I made a batch without adding them to the water, and you can see the difference.
In the meanwhile cook 1 litre of water with 1 kg of sugar for every kg of fruit in another pot for about 5 minutes.
When the fruit is soft, add it to the syrup with a thumb size fresh ginger cut into slices and a fresh chillie or two depending on your taste. I used one only...I had about 1kg of fruit. It gave it a definate bite, but not overwhelming.
Cook your fruit in the syryp until reaching softball stadium. Your fruit will become clear and almost seethrough. Bottle warm and seal immediately.
You need the peels of the watermelon cut into small 0.5x0.5cm squares. Soak overnight in a slaked lime solution of 5ml slaked lime added to every litre of water. The next morning drain it, and soak it for two hours in clean water.

In the meanwhile cook 1 litre of water with 1 kg of sugar for every kg of fruit in another pot for about 5 minutes.
When the fruit is soft, add it to the syrup with a thumb size fresh ginger cut into slices and a fresh chillie or two depending on your taste. I used one only...I had about 1kg of fruit. It gave it a definate bite, but not overwhelming.
Cook your fruit in the syryp until reaching softball stadium. Your fruit will become clear and almost seethrough. Bottle warm and seal immediately.
Project 184....pumpkin fritters
Pumpkin fritters are a traditional dish we all grew up with......or can I say Afrikaans kids grew up with, because I don't know why, but sweet vegetable dishes were always part of a cooked meal.....one savoury....one sweet.....
This is also a great way of using leftover cooked pumpkin the next day...or cook double the amount you need, and keep the rest in the fridge to make this the next day.....
 Add an egg to your pumpkin, a little sugar and cinnamon, about a tablespoon of butter and a teaspoon of vanilla essens. Now add some flour to form a soft mixture. Add 1/2 teaspoon of baking powder for every half a cup of flour used....this will depend on the amount of pumpkin you are using....
Heat a little oil in your pan and bake spoonsfull until done. Drain on a kitchen paper to get rid of excess oil and sprinkle with cinnamon sugar whilst still hot. Serve hot or cold.
This is also a great way of using leftover cooked pumpkin the next day...or cook double the amount you need, and keep the rest in the fridge to make this the next day.....

Heat a little oil in your pan and bake spoonsfull until done. Drain on a kitchen paper to get rid of excess oil and sprinkle with cinnamon sugar whilst still hot. Serve hot or cold.
Project 183....flapjacks
For one or other reason, my children never wanted to eat flapjacks. I think it is the taste of baking powder that is so overwhelming in many recipes.
A few year ago I saw this recipe on a cooking programme. The presenter said they are American flapjacks, but I never searched it, so I won't know. All I do know is that my kids love these, and if they are slightly undercooked in the middle, they are even better for them!
 Mix about 4-5 cups of flour with a little salt to taste, 1-2 teaspoons of sugar, about 45 ml of cooking oil, a 10g packet of instant yeast and lukewarm water to make a slightly runny mixture. Leave in a warm spot for about half an hour to double in size.
Spray your pan with 'spray and cook' and start baking spoons full at a time. It will make bubbles on the top when you need to turn them.
These are lovely just as they are, or with butter...butter and jam, and even with fillings like a sandwich.
I sometimes have a lot of visiting teenage boys over the weekends, and these are always a winner...breakfast...lunch...in between....and the leftovers are even not there for long!
Project 182......enlarging a shirt
The youth at our church designed these shirts, and before we knew, the whole church was wearing them and not the youth only. It is a lovely shirt to wear to outreaches, etc.
 They are pretty cool, but not for a DD like me! But before I knew, I had one as well, and it was made specially for each individual with their names at the back....and there is no other Sandra in the church...So the "I believe" stretched too large for my liking....
 After discussing it with some of the other ladies, I heard that they were in the same predicament, but their problem was around the hips. See, these are actually made on a rugby shirts pattern, and I believe the men like them tight all around! But we are all feminine women...but our names were on the back!....one of the ladies came with this plan......
We opened the sides all the way up to the sleeves and used some black material with these sporty netting on top and added a panel. Finish it off by working a seam just like the rest of the shirt. It was so easy, I think you can do it with lace on another shirt....... going to try it.....
Project 181......decoupage tins
By now you all know that our studies divided into two....a reasonably organised half....mine.....and my husbands half.....Shame poor thing! He is really fighting a paper battle!
I have tried many ways to organise him....putting out baskets for sorting papers for filing.....containers for stationary......coasters fur coffee mugs.....all with very little success.......all that still might help him is prayer!
Years ago when we planted the first church, I helped him with all the administration. It was totally disastrous! He landed up paying half of the expenses out of his own pocket cause he kept on loosing receipts! I ended up being upset with him, as he did not own a salary, and as it was I battled to keep the family going!
 Planting the second church, it was better for me to nurse and get a secretary for the church! I sometimes feel so sorry for the poor lady doing the church admin, as she became a dear friend over the years. I've never seen anybody with so much patience...both her and her husband......especially with my husbands filing skills!....and she is doing it never complaining......some people just deserve wings! If it was me still doing his admin, I think we would be halfway with world war 3! If one of us was not injured before that! Bless his soul!
On that note I made these pretty tins the other day, as I needed something for my paintbrushes and pliers.....for my half in the study!
I used tins from tinned food, and washed them properly to take off all the glue from the labels. Leave them to dry properly,because the tend to rust if not dried well, and spending so much effort to make them pretty will be all in vain if they rust after a short while. I have some tins(with cows on it) my mom did years ago that are still in use. Even when I wash them now, I just leave them to dry on a dishcloth in their own time. They don't even have a small rusted spot on them.
Spray paint your tins in a desired colour. I used white. Allow to dry.
Give the whole tin a layer of modge podge and cover with a serviette or in my case chiffon material. I had this lovely vintage feel chiffon material with pink roses that I used. Give it another layer of modge podge and allow to dry.
I've given my tin about 10 layers of modge podge to seal it properly. Change direction with every layer....one from top to bottom...allow to dry, then the next from side to side....next from top to bottom again.....continuing like that.
I then cut these lovely rose pictures from gift wrap, and added them to the fronts sealing it with about 10 layers of modge podge again. It looked quite pretty against the material background. You can do it without the material at the back as well, just adding your picture straight to the tin.....whatever your hearts desire!
Cheap and easy way to organise a craft room, or in my case....my half of the study!
I have tried many ways to organise him....putting out baskets for sorting papers for filing.....containers for stationary......coasters fur coffee mugs.....all with very little success.......all that still might help him is prayer!
Years ago when we planted the first church, I helped him with all the administration. It was totally disastrous! He landed up paying half of the expenses out of his own pocket cause he kept on loosing receipts! I ended up being upset with him, as he did not own a salary, and as it was I battled to keep the family going!

On that note I made these pretty tins the other day, as I needed something for my paintbrushes and pliers.....for my half in the study!
I used tins from tinned food, and washed them properly to take off all the glue from the labels. Leave them to dry properly,because the tend to rust if not dried well, and spending so much effort to make them pretty will be all in vain if they rust after a short while. I have some tins(with cows on it) my mom did years ago that are still in use. Even when I wash them now, I just leave them to dry on a dishcloth in their own time. They don't even have a small rusted spot on them.
Spray paint your tins in a desired colour. I used white. Allow to dry.
Give the whole tin a layer of modge podge and cover with a serviette or in my case chiffon material. I had this lovely vintage feel chiffon material with pink roses that I used. Give it another layer of modge podge and allow to dry.
I've given my tin about 10 layers of modge podge to seal it properly. Change direction with every layer....one from top to bottom...allow to dry, then the next from side to side....next from top to bottom again.....continuing like that.
I then cut these lovely rose pictures from gift wrap, and added them to the fronts sealing it with about 10 layers of modge podge again. It looked quite pretty against the material background. You can do it without the material at the back as well, just adding your picture straight to the tin.....whatever your hearts desire!
Cheap and easy way to organise a craft room, or in my case....my half of the study!
Friday, 8 March 2013
Happy birthday Blog!
I totally forgot my Blogs' birthday the 6th! Sorry Blog! Happy birthday!
It has been a fun year......Although I did not make my target by having 365 posts, I enjoyed it.....Blogging was also a remedy in a sort of way.....
We moved house, and I was very sad to leave the old house behind. I felt depressed......and I could not explain to anyone.....after all I'm a pastors wife! How could I tell someone I am depressed leaving a worldly thing behind! But for me it was not only a piece of earth that stayed behind....it was memories....my kids grew up there.....we've been through very difficult times there....we've healed from past hurts there......difficult to explain, but being in full time ministry sometimes cause such a lot of pain and hurt, and most of the time you have to work through it yourself with Gods grace and mercy......
But blogging with normal everyday stuff helped a lot.....and as I explained to my friend the other night.....everybody does not like everything......what may be great to me, won't always be great to you.....as long as I enjoyed it! You can always find something else you like....and together we can even full fill each other....life would have been so boring if everybody loved the same things!
So this is just to say.....I am still going strong, and I hope we are going to have much fun and pleasure this next year blogging together!
Thanx for all your patience this passed year when I lost my password....when I struggled to download pictures and times when I did not have time to post anything.....
May we all have a great second year doing things in and around our houses!
Love
Sandra
xxxxxxx
Wednesday, 6 March 2013
Last week on night duty I worked with a nurse from the other shift. She was reading a book in the early morning hours when this note fell out.....from 1989 .....a neighbouring school saying no school fees for anyone the whole year, and normal school fees are R100 per year for one child, and R200 for more than one.....promising that the child will stay an individual.....
 Eish.....where were the days......

Project 180...photo's of your garden flowers


 My husband took these photo's of some gardenflowers(zineas). I needed something for a small wall in a bedroom that had such a lot of hooks in it. Taking out the hooks would have damaged the whole walls' paint, and I did not feel like painting the whole bedroom. And did not have the money either!
I enlarged the photo's and printed them on normal printing paper.....put it in some frames I had, and covered the hooks hanging the three underneath each other.
You don't have to have money just a little bit of immagination.....

Project 179: a tip rather....making individual portions
 Ever got aaaahhhhs! when you are already cooking food? Or does it only happen in my house?
Well, I found a way of fooling everybody! Just make individual portions of good everyday food, and everybody will be so impressed with the effort, they 'sommer' eat their food!('sommer' is just a South African way of talking! It is an Afrikaans word that can have more than one meaning, but using it like this it can almost be 'just' or 'just like that')

I saw at our local Clicks store they have small individual portion serving dishes in the loveliest colours lately. Quite a pitty I already have these ones that's already in use! And boy! I've been using this for the past 20 years!
Project 178: pineapple topped meatloaf
My friend makes this often. It sounded so good, I had to try it. It was good. You know if all the boys and husband thank you for a nice supper, you know that you can make this one again!
Carien even makes it for her son in Pretoria and slice it in portions before freezing it. He then uses it for lunch. Sliced it is easier to remove only what you need, than to defrost the whole loaf. It is so tasty though, I think a boy will finish it off just like that, but definitely will eat more than's necessary!
I am going to give you the recipe the way I got it, but I only used half the condensed milk as I tried to reduce the sugar levels. Instead I used the juice from the tinned pineapples as I thought...why waste?
440 g tin pineapple pieces(drained)
30 ml brown sugar
5 ml curry powder
15 ml Worcester sauce
700g minced beef(if you can still find beef only! ha ha! News headlines this past week gives all the groase information of added donkey, horse and who knows what more!)
 80 g oats
1 egg
62.5 ml chopped onion
10 ml salt
2 ml pepper
5 ml mustard powder
250 ml condensed milk
Preheat your oven to 180*C. Butter your bread baking tin.(I used spray &cook)
Arrange your pineapple pieces at the bottom of your baking tin. Sprinkle the brown sugar over the pineapple pieces, followed by the curry powder and then the Worcester sauce.
Mix the rest of your ingredients together in a separate bowl, and then place it lightly on top of the pineapples. Press it firmly.
Bake for 1 hour until lightly brown. Turn out on a serving tray for the pineapples to be on top.
Project 177: carrot cake
 My baking son wanted something different from the usual cakes the other day. I suggested carrot cake, but we did not have nuts. Knowing his mom, he improvised, and used crushed peanuts and instead of cream cheese topping, he used normal butter icing sugar frosting.(the boys don't like cream cheese)
The end result was so tasty however, that I decided to share it.....his version....
You will need......
4 large eggs
1/2 cup of cooking oil
2 cups of sugar
2 teaspoons of vanilla
2 cups of flour
2 teaspoons of bicarbonate of soda
2 teaspoons of baking powder
1/2 teaspoon of salt
2 teaspoons of cinnamon
3 cups of grated carrots
1 cup of crushed peanuts
Mix everything and bake for 45 minutes at 180*C.
Leave to cool properly before adding frosting.
Mix frosting with butter, icing sugar and some vanilla and spread lightly on top.
Project 176: 2 minute bracelet
I love vintage type of clothing, and will jazz anything old up to wear it again. Lace and chiffon are my favourites.
 Last year my husband did a wedding. He married the last born of three sons from dearly beloved friends. It was quite a privileged to marry all three sons. It was even more special when we recently heard a testimony from a total different person(he was not aware we know the young man) about something he did and how pleased they were with his Christianity. Well done Corne!
Anyhow, their wedding had a vintage theme, and it was actually so nice to dress up with hats galore!
As thank you gifts the ladies got a string of pearly beads, and the men key rings. We also got these ribbons with champagne coloured beads around the menus. For one or other reason I kept the ribbon just as it was.
The other day I needed something in the colours to match an outfit.....I tied it around my arm with a bow, and voila! A bracelet!
Handy to keep old stuff sometimes!
Project 175.....gardenflowers in buckets
I love setting tables for dinners with friends. My husband always says that whether it is 5 or 50....I'll go through the same effort!....I mean....if I have to spend time in the kitchen cooking, why dish it up on a table that's not worth the effort? Really, then you could have bought some take aways!

Years ago I bought myself about a dozen small galvanised buckets(they were cheaper the more you bought!) and I use them often. I even bake small breads in them sometimes!
Last night we had friends around and I did a table outside on the deck as the weather was pleasant.
 Although my garden looks quite pretty at the moment, there's hardly any flowers.....just many different leaves. But the herbs are doing their bit, so I made a row of these little buckets in the centre of the table, and simply filled them with fresh herbs, and a rose or nasturtium added here and there for some colour.
I did not think of posting this, but my friend was quite adamant that I should have taken a photo of the table, so I decided to post the buckets.....
Using fresh herbs like mint, thyme, rosemary and lavender gives a lovely fresh smell in the evening breeze, and a few containers used together can actually give your table a calming fragrance. I brought them in and placed them in 3's here and there in the house, and you can not believe the smell.
These buckets are quite handy to have. The other day we had a braai at church, so I hung them with colourful ribbons from the roof of the braai area. I added some greenery only. I even hung them from a tree as well before with roses in them.
If you can not find any where you live(these are originally quite African. They are normally handmade by people in the rural areas, and you can buy them next to the roads) , simply make your own buckets from recycled tins. They work just as well. I have a previous post on that.
Moral of the story.....your table never has to be without flowers......use whatever you have!
PS! Look at the colour of the roses.....strawberry and chocolate the label said. They are beautiful!

Years ago I bought myself about a dozen small galvanised buckets(they were cheaper the more you bought!) and I use them often. I even bake small breads in them sometimes!
Last night we had friends around and I did a table outside on the deck as the weather was pleasant.

I did not think of posting this, but my friend was quite adamant that I should have taken a photo of the table, so I decided to post the buckets.....
Using fresh herbs like mint, thyme, rosemary and lavender gives a lovely fresh smell in the evening breeze, and a few containers used together can actually give your table a calming fragrance. I brought them in and placed them in 3's here and there in the house, and you can not believe the smell.
These buckets are quite handy to have. The other day we had a braai at church, so I hung them with colourful ribbons from the roof of the braai area. I added some greenery only. I even hung them from a tree as well before with roses in them.
If you can not find any where you live(these are originally quite African. They are normally handmade by people in the rural areas, and you can buy them next to the roads) , simply make your own buckets from recycled tins. They work just as well. I have a previous post on that.
Moral of the story.....your table never has to be without flowers......use whatever you have!
PS! Look at the colour of the roses.....strawberry and chocolate the label said. They are beautiful!
Project 174.....pickled tomatoes
End of summer spells lots of tomatoes....
I usually freeze some for cooking, make tomato sauce, bottle tomato and onion mix, eat , dish out, and still land up with hoardes of tomatoes.....
Then one morning my husband asked if I could not pickle them like I did with the cucumbers.....so I searched for a recipe on the net, and got this very easy one. They taste great, but I don't know how long their shelve life will be. Anyhow, they look pretty neat as well....
 Sterilize your jars. I only had some tomatoesauce and chutney bottles left as I really did quite a lot of pickling and bottling this season. But they worked well, and I think they even look better in these bottles, as you can see all the differrent colours as well.
Wash your tomatoes properly and prick them once or twice with a toothpick. Fill your jars to the top.
In the meanwhile bring 3 cups of white vinegar, 3 cups of water, 4 tablespoons of coarse seasalt, 4 tablespoons of sugar, 8-12 peppercorns and 8-16 cloves of garlic to the boil. Allow to simmer for a few minutes and allow to cool slightly before pouring it over the tomatoes. Seal the bottles when they are still hot.
The original recipe had coriander seeds in it, but I ommitted it....and the added some fresh dill in the bottles. I did not have any, but added 3-4 fresh rosemary leaves in stead.
According to the original recipe this is apparently great squeesed on pasta. I haven't tried it yet, but is definately going to. Store in a cool place away from direct light.
Project 173: good oldfashioned tomatosalad
Look at my harvest from the other morning.....pretty!
 I don't think anyone who has never eaten tomatoes from his own garden has tasted the sunshine in a tomato......whether from a pot on your balcony, or planted between your flowers, or from a real veggie patch...as long as you have nurtured it yourself...the taste is just soo much better than out of season shop bought ones produced for masses....
If you ever make the effort to grow your own tomato plant, you will even be surprised at how much tomatoes one plant can produce. It is really worth the try!....and a tomato plant just grows anywhere!
 I can still remember basic tomato salads from childhood..... even today I'll easily slice some fresh tomatoes....with or without some onions....add some vinegar and coarse salt and freshly ground black pepper. Place in the fridge to cool nicely if you don't eat it straight away! A small dash of olive oil and fresh basil from your windowsill even makes it better!
My middle son loves this as well, and we often have it for lunch after a hot day at school. We both with our own bowl of tomatoes......we don't like to share!
 I don't think anyone who has never eaten tomatoes from his own garden has tasted the sunshine in a tomato......whether from a pot on your balcony, or planted between your flowers, or from a real veggie patch...as long as you have nurtured it yourself...the taste is just soo much better than out of season shop bought ones produced for masses....
If you ever make the effort to grow your own tomato plant, you will even be surprised at how much tomatoes one plant can produce. It is really worth the try!....and a tomato plant just grows anywhere!

My middle son loves this as well, and we often have it for lunch after a hot day at school. We both with our own bowl of tomatoes......we don't like to share!
Project 172.......bracelet from leftover scrap material

 I rediscovered my sewing machine! Not that it was gone, I just hate sewing.....but I've set it up in my half of the study last week and actually made two dresses since then....one easy one from Pinterest, and a more complicated one from a real pattern....
I love the feeling of the chiffon on my skin, and was playing with the leftover scraps whilst looking at my handwork, so I decided to make a bracelet from the pieces I was playing with......
I simply tied a knot in a ribbon like piece, and started to tie more ribbons around it until it was the desired thickness. I made the original circle slightly larger than my hand, as it tends to go smaller when you start tying the material around it.
I then zooshed it up with some ribbon, lace and buttons.......easy way to keep little girls busy!.....pity I only have boys......
Subscribe to:
Comments (Atom)